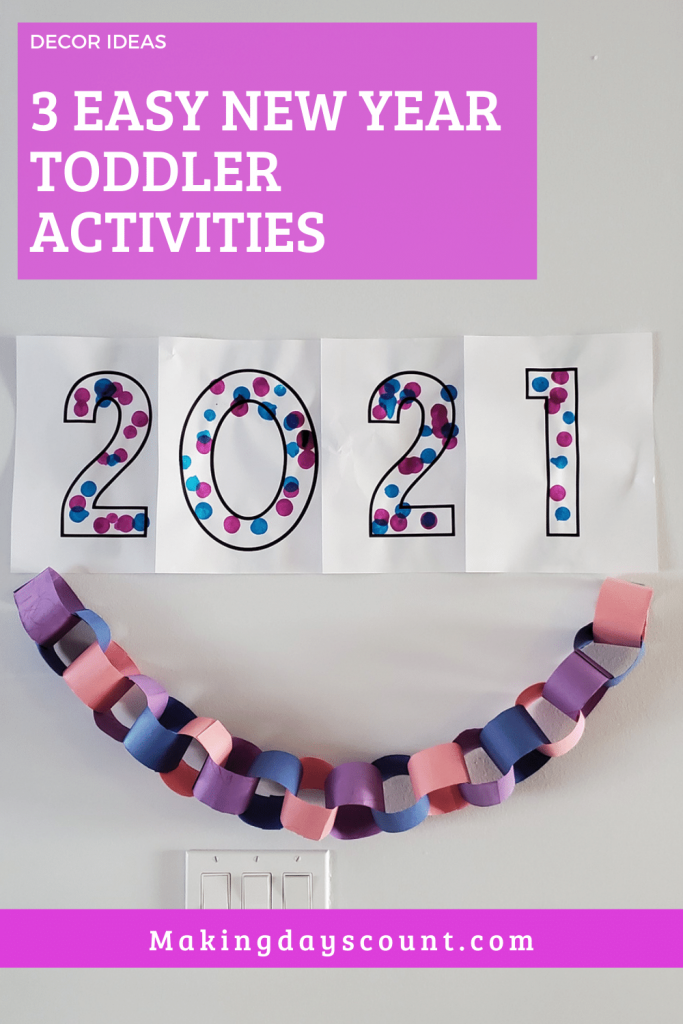
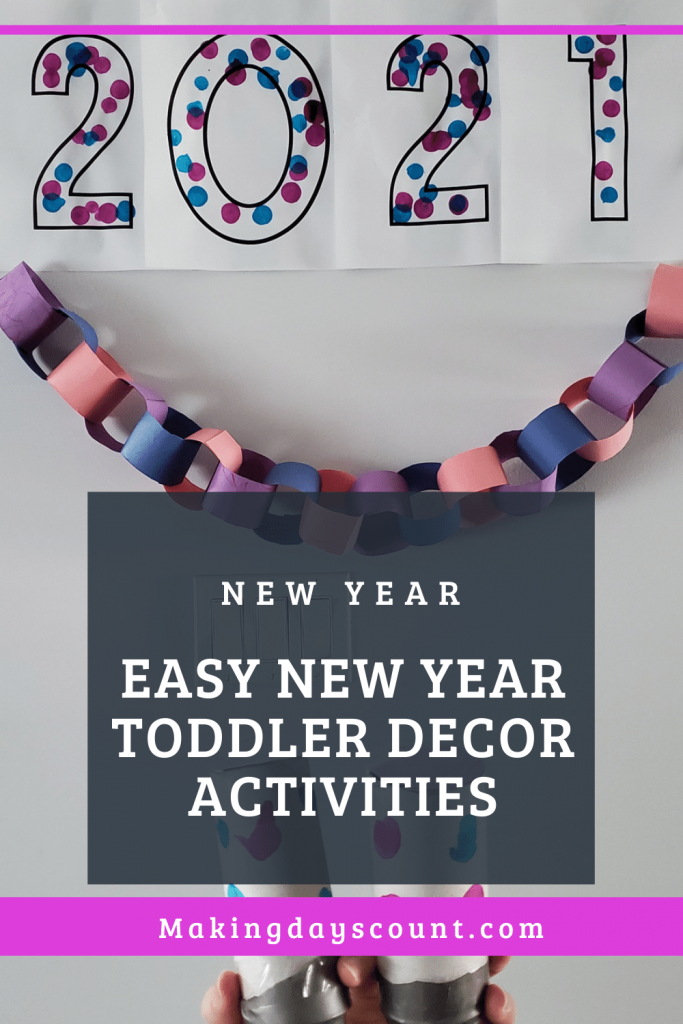
The new year is coming up and it’s time to get creative with toddler activities our children can do before January 1.
In this blog post, I’ll share with 3 really easy and budget friendly projects you can do with your toddler.
These can keep them busy and also be festive for the upcoming new year.
Pin this for later!
Contents
Here are 3 easy New Year Toddler Activities:
BY CLICKING THE LINKS AND MAKING A PURCHASE, I MIGHT BE EARNING A SMALL COMMISSION AT NO ADDITIONAL COST TO YOU. PLEASE SEE OUR FULL DISCLOSURE FOR MORE DETAILS.
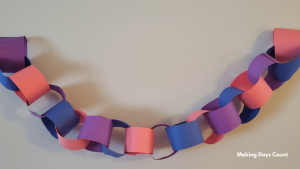
1. New Year Chain Link Garland Decor
What you need:
- Construction paper (here is a pack of construction paper you can get online)
- Scissors
- Glue (or Stapler/ staples)
- Stickers or crayons to decorate (Optional)
- Painter’s tape (you can buy online here)
Step 1: Cut your construction paper into long strips
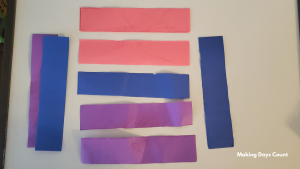
I decided to go with 3 different colors for my chain link garland. They were blue, purple, and pink. I used what we had in our house since I want to keep it as budget friendly as possible. You can use any colors of your choosing and get them from the dollar store or online.
I have a total of 18 strips. Each of my strips is about 2.5″ by 9″. Depending on the size of your paper, you can cut them thinner and longer. For example, if you have a 8.5″ by 11″, you can cut them vertically into 4 strips of 2.125″ by 11″ or horizontally into 4 strips of 2.75″ by 8.5″.
Optional: You can get your toddler to decorate the strips of paper before or after you cut your paper. Use markers, stickers, crayons, or even washable paint to decorate these strips.
Step 2: Glue your first chain link.
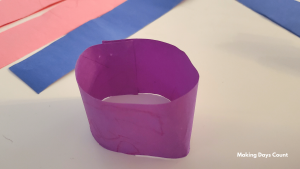
Make a loop with your first strip of paper and glue the ends together similarly in the picture. Press it tightly together for a few seconds and it should hold well.
I asked my toddler to help me put the glue on and we hold it together while counting for 3 seconds. If you want to make that it’s really sturdy, staple it down instead of gluing it.
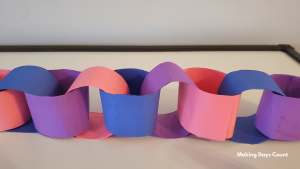
Step 3: Join your chain link garland together.
After gluing or stapling your first strip of paper, loop the next strip of paper inside the first strip of paper and gluing/stapling the ends of the second one together.
Then, you do the same with the third strip of paper with the second one. Now you have the beginning of the chain link.
As you start looping and gluing/stapling the strips of paper one at a time, you will start to see a chain link form.
You might have to take a break if your toddler, like mine, can get easily distracted by her toys and wanting to play something else.
Step 4: Hang the chain link garland up
I would highly recommend using painter’s tape to hang your garland up so that you will not damage your wall.
Depending on how long you want your garland to be, you can make swirls or just a straight line if that is what you prefer. Have fun with it and be sure to secure it at a place where your toddler can enjoy looking at it, but not necessarily pull it down.
Have fun making this New Year Chain Link Garland with your toddler!
2. Painted New Year Sign
What you need:
- Access to Microsoft Word or Canva
- Printer with paper or access to your local print shop
- Bingo markers (or Washable Bingo Marker ones)
- Painter’s tape (you can buy online here)
Step 1: Open up Microsoft Word or Canva
Open up Microsoft Word or Canva (if you don’t have Word) and make sure that your document size is 8.5″ by 11″. I used Canva because I do not have Microsoft Word on my laptop.
Choose an outline font. For Microsoft Word, check out this tutorial on how to make an outline text in Word.
Step 2: Choose your Outline font
For Canva, click on Insert Text and choose “Add a heading”. Next, click on your font type and type in “outline” in the font search bar, and choose one of the ones you like.
Since I have Canva Pro (I use it for my blog), I chose the Explore Outline font.
Step 3: Decide on how big you want your numbers to be
I wanted one number per page to make it look really nice and big. Also, I wanted more space for my toddler to decorate on these pages.
The font size for my numbers were 800. I think it was the biggest that it could be.
Step 4: Print your numbers out
Whether printing at home or at a local print shop, print them in black and white and single-sided.
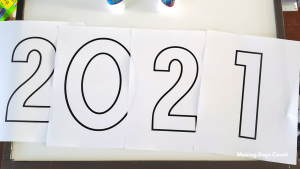
This way you can display all your numbers at the same time. Also, it’s cheaper to print in black and white.
Step 5: Let your toddler decorate
We used these bingo markers that my mom gave to us. I guided my daughter to mark within the lines. However, it is up to you how you want your toddler to decorate.
Similarly to the previous project, you can ask your toddler to put stickers around the numbers, paint within the lines, or even draw around the numbers. If you don’t want them to affect the numbers but only decorate around it, use painter’s tape to cover the numbers. After they are done, you can remove the painter’s tape and the numbers would be as good as new.
Step 6: Hang your numbers up
I put painter’s tape behind each paper and posted them up above the New Year Chain Link Garland.
If you want, you can even put washi tape around each paper to emphasize on 2021. These are great New Year washi tape options!

Shameless plug: If you want to learn how to make these white and hot pink flowers, check out my Etsy flower hard copy templates here.
3. New Year Poppers
What you need:
- Empty toilet roll (or plain paper cup of you prefer)
- A balloon
- Scissors
- Tape
- Construction paper (here is a pack of construction paper you can get online)
- Bingo markers (or Washable Bingo Marker ones)
- A Pencil
- Pom Poms
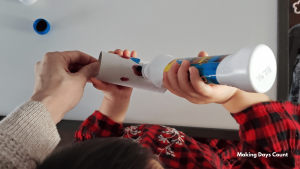
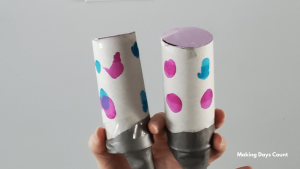
Step 1: Cut and decorate your toilet roll or paper cup
For this third New Year Toddler activity, you’ll be making a Pom Pom Popper. If you are using a paper cup, cut out the bottom of the cup so that you can see through it like a monocular. If you have a toilet roll, you can go ahead and decorate it.
Using our Bingo markers, I asked my toddler to start marking around the toilet roll. You can use New Year stickers, crayons, or even Washable Bingo Markers if you like.
Since she had some experience using the Bingo markers from the previous project, she took her time to press them around the roll.
Once you are done, let it dry.
Step 2: Trace the end of the opening of the toilet roll or paper cup on a construction paper
After it dries, put the opening of the paper cup or toilet roll (you choose which side) on top of a construction paper.
Trace the opening on the construction paper with a pencil.
If you are using a toilet roll, label the opening by writing a letter or number on the inside part of the roll. I labelled the circles too as I was making lids for two separate toilet rolls.
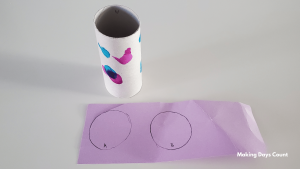
Cut out the construction paper according to your toilet roll or paper cup opening size. Set aside.
Step 3: Cut and tape your balloon
Taking your balloon, cut about half an inch at the top.
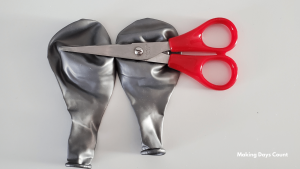
Then, you can get your toddler to help you put the balloon about half an inch on the bottom end of the paper cup or toilet roll, not the opening side.
Once the balloon is placed, tape the balloon with clear tape to secure it.
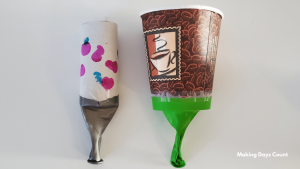
Step 4: Insert pom poms
Put pom poms of different size and colors into your roll or cup. I would recommend the small and medium size ones will do.
Ask your toddler to help you with this task, it’ll get them excited to pop these pom poms out.
Step 5: Tape your lid on
With the construction paper you placed aside, tape it on the opening of the roll or cup.
The purpose is to keep the pom poms in when you do not want them all over the place.
When you want to play with it, remove the lid.
Step 6: Have fun popping!
Show your toddler how to pull the balloon backwards and release it so that the pom poms will pop out of the roll or cup.
It’s really fun to see their reaction to see the pom poms flying everywhere.
Have a go at it and have a Happy New Year!
Related:
- Indoor Toddler Activities
- Toys my 22 month old toddler loves
- 5 Types of Books My 21 Month Toddler Loves
Thank you so much for reading my blog post on “New Year Toddler Activities”. If you like what you read, please pin the image below and share it with others. Thanks!
Leave a Reply